Use above Custom Search to search for relevant topics

Sunday, December 23, 2007

Different profiles for different blogs

Different Blogger Profile using different email addresses

Some bloggers, including me, wants to have different profiles for different blogs. An example is Enviroman Says: An Environmental blog and Blogger Tips and Tricks. In the first case, the profile photo is a meaningful environmental cartoon. In the second case, the profile photo is my real photo, a very rare photo of me laughing away. This can be achieved by using 2 different Blogger accounts, which means having 2 email addresses, which also means more work as you have to be active for the email addresses you created.

In the case of Gmail, their Terms of Service says if your gmail is not active for more than 9 months, it will be deleted, and I suppose your Blogger account together with your blogs will go too as they are all tied together by a Google account.

Yahoo promised email address for live when I created my first Yahoo email address, but you don't see that anymore. I have yet to find out what their new terms are, but I know for a fact your Yahoo mail is deactivated, but not deleted if inactive. It is practically impossible to reach Yahoo for clarifications.

Whatever it is, I would advice against using a Gmail address to create a Blogger account, and not only that, when you are signed into a Blogger account which uses a non-Gmail address, never create a Gmail account as then the new Gmail (Google) account will hijack the Blogger account and you will have to use the new Gmail address to sign into Blogger. I will write more on this later.

Advantage of using different Blogger accounts for different blogs to get different Profiles is that you can use different display names (names that will appear as "Posted by ....." at the bottom of all the posts in all the blogs, so this should be the method you use if that is what you want.

Another advantage is that you can add your lists of interests, favorite movies, favorite music and favorite books to the profiles, and each of them become active links with which you can use to find bloggers with the same interests and favorites, plus there is a chance that your profiles, and thus blogs, may be found by other bloggers doing the same thing. This may help increase traffic to your blogs as described in Increase traffic to your blogs by adding interests and favorites to your profile.

Different Profile using the same Blogger account

If maintaining more than 1 email address is too much work for you, you will have to use a work around like Different profiles for different blogs using the same Blogger account. The disadvantages of this method that at least one profile will not be a standard Blogger profile where you can add interests and favorites to try to increase traffic to your blogs as described in Increase traffic to your blogs by adding interests and favorites to your profile. Further, every posts in EVERY BLOG will have the same display name displayed as "Posted by .....". There is no work around this except perhaps to remove that "Posted by..." in those blog where you don't want your display name to be displayed.

Why I have the same display name in blogs using different Blogger accounts and how to have different display names for different blogs

I have a few Blogger accounts for various (non-sinister) reasons such as wanting a different Profile photo for different blogs, creating a Blogger Beta account when Blogger Beta (now New Blogger) was first introduced, fear of running into the limits for storage, etc. However, I chose to use the same display name for all the blogs. If I want different display name, that is not a difficult task to do. All you have to do is to sign into blogger.com which will take you to the Dashboard. At the top right corner, click on EDIT PROFILE and you can then change your display name to whatever name you want.

Sunday, December 9, 2007

How to get deleted Blogger account back

This is put up right at the top to help a desperate blogger who accidentally deleted her Blogger account and need help to get it back. So a quick section right at the top first and this post will be edited later:

First, Blogger usually will advice that the blogger probably has forgotten he of she has created more than one account and will suggest going to Forgot password and see if you can make some headway there.

Failing that, try problems. You may be taken on a merry-go-round, but perhaps if you have problem but come across a set of choices where there is a "report a bug", select that and see if you can connect to Blogger Support.

The rest of the post is not ready. Got to rush off to a gathering to support some people who had been unjustly arrested. Hopefully, this will lead to some solution. If not, leave a comment.

The rest of the post will be edited later:


This is a tough topic because the goal post keeps changing. I have made 3 previous posts which have multiple editing and updates because Blogger Support keeps changing the way they can be contacted. The previous posts are

Contact Blogger Support

Contact Blogger Support Part 2

Problems signing into Blogger Dashboard, don't see your blogs in Dashboard (note: Blogger Help says often the reason is because the blogger may have created 2 Blogger accounts and forgot about the other one, and therefore don't see those blogs in the forgotten Blogger account in the signed-in Blogger account. You may test this by

Sunday, November 11, 2007

Create new blogs with Google Blogger

It is very easy to create a new blog with Google Blogger. All you need to do is to sign into blogger.com (Dashboard) and click "Create a blog" link at the top of the Dashboard, and you will be taken to a page to create a blogspot.com URL:

Google Blogger create a blogspot.com URL

In the second line, you will notice that the http:// has already been added to the front of the URL and blogspot.com is already added to the back of the URL. All you need to do is to type in something in front of blogspot.com and the URL of your newly created blog will become

http://myblog.blogspot.com

where myblog can be anything you choose. However, preferably use some key words that will help describe the content you intend to put in the blog. This is for SEO (Search Engine Optimization (click BACK button to get back to this page) to help surfers using search engines find your blog more easily. There is a controversy over the use of hyphen ( - ) to separate words and I have not thoroughly research this area yet, but for the moment, I use hyphen for all my URLs. For example, the URL of this blog is

http://blogger-tricks.blogspot.com

I actually wanted

http://blogger-tips.blogspot.com

but that has been taken already by others and not available. I would suggest you check the availability of the blog URL you chose by clicking "Check Availability" and if it is not available, you can get creative and try to use alternatives that still have the key words in the blog URL. There are some suggestions in What to do if a blogspot.com URL is not available (click BACK button to get back to this page).

Using important keywords is important for SEO (Search Engine Optimization because the search engines places great importance on the URL of a website.

http://blogger-tricks.blogspot.com

and similar blog URLs are sub domain of blogspot.com and belong to Google Blogger, but now with the New Blogger (or just plain Blogger), you can register your own domain and convert your existing blogspot.com blogs to using New Blogger custom domain (click BACK button to get back to this page) and the new domain for your blog will belong to you and not Google Blogger, and many says command more respect from surfers as they say using blogspot.com is like using your house address for business. Potential business partners and customers may look down on the use of home addresses for business.

I have published a post giving reasons why I never use custom domain, but I have changed my mind.

What is more important to me now is the fact that the Google PageRank of a blogspot.com blog like this one belong to Google Blogger and you cannot sell a blogspot.com blog, but you can sell a blog using New Blogger custom domain (click BACK button to get back to this page).

None of my children have indicated any interest in taking over my blogging ventures, and I am in the process of using a custom domain. I can actually convert this blog to use custom domain, but the PageRank of this blog will not transfer to the new domain. Although Blogger will redirect traffic to

http://blogger-tricks.blogspot.com

to my newly created domain

http://blogger-tips-tricks.com

if I convert this blog to use the above domain, I am not sure about links to individual post pages (permalinks) of which there are many. I suspect they will become dead links and search engines do not like dead links on a website and may penalize the website for the dead links. I will later conduct a test to confirm this.

I thus have created this new blog Tips and Tricks for Google Blogger which will eventually be using custom domain when I find the time and is confident there will be no problems.

Diagnose a problem when you don't have access to a Blogger Account

Supposed a blog reader request help regarding a problem with their blog, but you do not have access to his or her account of what ever blogging platform he or she is using, what can you do.

Sometimes you can spot the problem by clicking VIEW > PAGE SOURCE (FireFox or just VIEW > SOURCE in Internet Explorer. A new window will open with the page source (source code) that is used to display your blog with a web browser.

I was asked about a problem a blogger had with replacing a graphic in her blog Header, so without access to her account, I had to view the page source of her blog. I found this in the page source:

#header-wrapper {
float: left;
width: 198px;
height: 148px;
background: url(https://blogger.googleusercontent.com/img/b/R29vZ2xl/AVvXsEi06LsA6fWprFKyNBhJFPyzOtL1VMPKvGRz59ZlXydCOwxrRxenvfzK67F396bP-qVJbu3UhKN95d8PdNx2oiX4r7ROX_6a2h-PVtDkhWUJ-LrTW9TAIqCv21LVozyowSqAPuODdPzQepk/s1600/img1.jpg);
border: 1px solid #939A3C;


The URL of the graphic for background of her blog Header seem to be the one highlighted in red in the scroll box above. So the only thing I can tell her is to replace that

graphic background of the graphic image URL with another image uploaded to the web, and this is what I am going to tell her.

The only problem is, when I opened a new tab in the same window in FireFox which has tabbed browsing, which is my favorite browser and which is a browser recommended by Google Blogger, pasted her image URL into the address bar, instead of taking me to the web page with only the image she used as background graphic for her blog Header, I was asked to download a file which is very surprising. If her graphic image is not on the web, but only hosted by a file host which host the graphic image file and only give your the URL to download the image file, I would expect no image would be displayed in her blog Header. But when I viewed her blog, there is an image in the blog Header.

This puzzled me and I do not know what is the situation. I can only explain to her, asked her what she did, and see if anything can be done. If there is any development, I will put an update here.

Saturday, November 10, 2007

Hyperlink open in new window or tab

In response to a blogger request, here is the HTML for a hyperlink that opens in new window and tag (that is, visitor will not lose your site):

<a href="target URL" target="_blank">anchor text</a>

or

<a href="target URL" target="new">anchor text</a>

NOTE:
1. target="....." has been deprecated and is not XHTML compliant and will give errors when you try to validate your website with
http://validator.w3.org/

This is because the people drafting the new standard feels that this should not be forced upon visitors but left to visitors to make a link open in the same or new window or tab (you can make a hyperlink open new window or new tab by right-clicking on a link and choosing either). But how many surfers know how to do that?

target="...." is still effective in many current browsers. Don't know about the future.

2. anchor text is the text that will be displayed by the browser. For example this is the HTML to the father of this blog which will soon be converted to custom domain:

<a href="URL" target="_blank">Blogger Tips and tricks</a>


and the browser will display it as

Blogger Tips and Tricks

Anchor text is important from the SEO (Search Engine Optimization) point of view. Refer to Importance of anchor text in hyperlinks.

3. Many webmaster feels that forcing visitors clicking on links in your site to open new windows or tabs is a wrong strategy and may discourage repeat visits, but this subject is controversial. Do your own research.

Friday, November 9, 2007

Embed Powerpoint Presentation in a post

It is now possible to embed a Microsoft Powerpoint presentation into a Blogger post. Here is a demonstration: Success depends on attitude and not resources.

To do this, you will have go to Scribd. You can either just upload your Powerpoint file from your computer to Scribd, but I would advice that you sign up for an account first (you can upload first, you will be given a chance and encouraged to register for an account later when you publish. The reason for signing up is when you have an account, you can get access to all the files you uploaded to Scibd, you can edit or delete the files you uploaded.

Click on the upload button, click on the "Click to Upload" button:

Scribd Click to Upload button

wait for the file to be uploaded, then click the "Publish" button:

Scribd Publish button

After successfully publishing, there will be a script for you to copy and paste into your post. The only thing is, you have to ensure that the script will fit into the main column (posts). If you don't know the widths of the different sections of your blog, refer to How to find the width of your blog Header, main column (posts), sidebar.

For example, from the template of Motivation and self-improvements which is the blog where the above Powerpoint presentation was embedded, we get this from the template:

#main-wrapper {
width: 400px;
margin-left: 20px;
float: left;
word-wrap: break-word; /* fix for long text breaking sidebar float in IE */
}

That tells us that the width of the main column (for the posts) is 400 pixels. The original script for the above Powerpoint presentation was

<object width="450" height="500"><param name="allowScriptAccess" value="SameDomain" /><param name="movie" value="http://static.scribd.com/FlashPaperS3.swf?guid=28hdkelx2skr9&document_id=273703" /><embed width="450" height="500" src="http://static.scribd.com/FlashPaperS3.swf?guid=28hdkelx2skr9&document_id=273703" type="application/x-shockwave-flash"></embed> </object>


Note that the width is 450 pixels and the height is 500 pixels (highlighted in red). What is important is the width. The height you can edit to any value you want, but the width must be 400 pixels or less. Also, note that the widths and heights occurred twice in the script. I thus edited the width to 400 pixels and the script that I used to embed the Powerpoint presentation in Success depends on attitude and not resources is shown in the scroll box below:

<object width="400" height="500"><param name="allowScriptAccess" value="SameDomain" /><param name="movie" value="http://static.scribd.com/FlashPaperS3.swf?guid=28hdkelx2skr9&document_id=273703" /><embed width="400" height="500" src="http://static.scribd.com/FlashPaperS3.swf?guid=28hdkelx2skr9&document_id=273703" type="application/x-shockwave-flash"></embed> </object>

Ttile and caption for photos or images

There are various ways to add a caption to an uploaded photo. Here is one: Add caption to photos uploaded via Blogger. However, this method can only be used to add a caption, not title, plus the caption will like to the photo on the web. You can't link to a website of your choice.

Add title and caption to photo and if you wish, link caption to any website you choose

This method uses tables. You will have to use the EDIT HTML Blogger EDIT HTML mode tab mode for your post editor. Click this tab at the top right of the post editor.

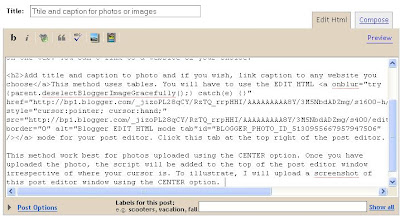
This method work best for photos uploaded using the CENTER option. Once you have uploaded the photo, the script will be added to the top of the post editor window irrespective of where your cursor is. To illustrate, I will upload a screenshot of this post editor window using the CENTER option. Once uploaded, the script used to display the screenshot appeared right at the top of the post editor window. I will display the script in the scroll box below to give you an idea of how the script looks like:

<a onblur="try {parent.deselectBloggerImageGracefully();} catch(e) {}" href="https://blogger.googleusercontent.com/img/b/R29vZ2xl/AVvXsEjIunBvoCPpl1v52mG1GbSKSGSVX-PmyCh7UeXZ-ZLzIaP9O8YOB6VfVXotcUCmR4UVYawUzxf2sUGSZ8-Lj5WeMPKB9DLR1yxIQbqXqMpSpI0hreJG_jemCHNZcJhQbUhJJcPkYlo2hVUR/s1600-h/post+editor+window.jpg"><img style="display:block; margin:0px auto 10px; text-align:center;cursor:pointer; cursor:hand;" src="https://blogger.googleusercontent.com/img/b/R29vZ2xl/AVvXsEjIunBvoCPpl1v52mG1GbSKSGSVX-PmyCh7UeXZ-ZLzIaP9O8YOB6VfVXotcUCmR4UVYawUzxf2sUGSZ8-Lj5WeMPKB9DLR1yxIQbqXqMpSpI0hreJG_jemCHNZcJhQbUhJJcPkYlo2hVUR/s400/post+editor+window.jpg" border="0" alt=""id="BLOGGER_PHOTO_ID_5130957725247282306" /></a>


I highlight all this script, right-click and select paste. Then I scrolled vertically down the post editor window and pasted it below:


However, the job is not finished yet as there are no title and no caption. So I will copy the script used to display the screenshot above to below this sentence and then add some HTML for a table:

This is the title of the screenshot
This caption will link to the "father" of this blog Blogger Tips and Tricks


There are lots of possibilities once you learn a bit of HTML. I can make the title red, for example, by surrounding the title with the <span style="color:red;">TITLE</span> or bold: <span style="font-weight:old;">TITLE</span> or even both red and bold: <span style="color:red; font-weight:bold;">TITLE</span>

Thursday, November 8, 2007

Merge two Blogger account into one

"I think I may have created two google accounts without realizing what I was doing. I see that I now have two 'profile' areas. I want to cancel the account that I opened today, but leave the account open with my same profile that is with my current blog."

This was the question posed by a blogger. Answer is simple. For this task, it is best you use 2 different browsers for the 2 different Blogger account. (This is one of the reasons I have 4 browsers in my computer. It used to be 5 until I got this new computer. To read about my reasons, go to Why you should be using more than 1 browser.) By using 2 browsers, you can be logged into your old Blogger account (and email) in one browser, and into your new Blogger account in another. You will then not need to keep on signing in and signing out to carry out this task.

From the new blog created with the new Blogger account, click LAYOUT in the Dashboard for that blog. In the LAYOUT, click the SETTINGS tab, then the PERMISSION tab:

Blogger settings permission tabs

You will then get to the page which will enable you to "Add Authors":

Blogger settings permission Add Authors

Click "Add Authors" and in the resulting box, type in the email address you used for the old Blogger account. Then click "Invite".

Check your Inbox in that email address to look for the invitation email, accept the invitation. Go back to your new Blogger account, and in the "Permission tab" you should see a new author (yourself) added. Tick the box to make yourself an administrator, and if you wish, you can then delete your new Blogger account for the new blog, and you will then have the 2 blogs in your old Blogger account and can do all you desire with both blogs. However, err on the side of caution, do not delete yourself until you are sure everything is going fine.

If anything is not clear, just make a comment.

Wednesday, November 7, 2007

Backup and edit old classic Blogger template

The New Blogger with the New Blogger template is a big improvement over the old classic template in many areas, including enabling bloggers who know nothing about HTML, CSS or Blogger tags to customize their blogs which they would be hard pressed to do with the old classic template. Plus there is no more "Republish" plus that sometimes forever spinning.

Now if you want to know whether you are having the old classic Blogger template or the New Blogger template, refer to the screenshot below:

how to differenciate between old classic template and New Blogger template

Note that the top blog (Earn with Google AdSense) has a link LAYOUT circled in red. This blog is using the New Blogger template. For the second blog (Thur's template test blog), the link is TEMPLATE, also circled with a red ellipse. This blog uses the old classic template. Now I hope you know how to distinquish between old classic template and New Blogger template.

Backing up the New Blogger template

While there is a lot that I like about the New Blogger template, there is one big difference when you backup the template which irritates me. With the New Blogger template, when you backup the template, you also have to backup whatever Page Elements that you can backup (some like the Proflle, Archives, Link List, cannot be backup). The reason is, whenever you change New Blogger templates, some Page Elements will be deleted and some will become empty. Thus when you have backup Page Elements, you can easily put back in the missing or empty Page Elements. For more details, refer to Backup and change New Blogger template PLUS backup Page Elements or Backup and edit New Blogger template plus backup Page Elements

Backing up old classic Blogger template

Backing up the old classic template is a simple process. All you need to do is to sign into blogger.com (Dashboard), then click the TEMPLATE link (highlighted by a red ellipse in the screenshot above). This will bring you to the template editor. Click inside the template editor window, click ctrl+A to highlight all the codes in the template, click ctrl+C to copy the template, open an Notepad file, paste the template into Notepad, save the Notepad file in, say, a folder named "Templates" and preferably a sub-folder with the name of the blog if you have more than one blogs. Use a file name that gives as much information about the backup template as possible. Make full use of the possibility of using long filename. Name the backup template, for example, "Thur4s template test blog before expandable post summary hack 7 nov 07". In this way, if you ever need to use back any backup template, you will know which backup template to use.

The advantage here is, all the customizations (visitor counter, scripts for advertisements, search box, etc., are all incorporated into the backup template. There is no Page Elements to backup.

Editing old classic template

Now that you have your current template safely backed up, you can freely edit your old classic template without fear. If anything goes wrong, or you don't like what you have done, all you need to do is to fetch the backup template, click inside the edited template, press ctrl+A to highlight the whole template and press the delete key. You should now have an empty template editor window into which you can paste the backup template into and save, and you will be back to where you were before. No empty or deleted Page Elements to add back.

Tuesday, November 6, 2007

Install invisible music player and why you should not do it

For an example of a blog with an invisible music player, go to Invisible background music player with your speakers turned on.

I don't recommend this, but there are bloggers who want it, so I will describe how first and explain why I advice against it later.

How to install an invisible music player to your blog

The very first thing you have to do is to upload your music file to a online file host which will put your music file online and not those that let you upload the music file and require anyone to listen to the music to click on a link to download the music file.

Once you have uploaded the music file to the web, get its URL.

Sign into blogger.com (Dashboard) and you will see a list of blogs you have created. Of course if you only have created one blog, you will see only one. Whatever it is, click LAYOUT and in any section, I recommend the footer, click "Add a Page Element", and in the "pop-up", select HTML/Javascript, then add this script into the HTML/Javascript box:

<embed style="width:1px; height:1px; visibility:hidden" autostart="true" loop="true" src="URL of music"/></embed>


You will of course have to substitute URL of music with the URL of your own music which had been uploaded to the web.

The attribute loop="true" play continuously. If you want it to play only once, you will have to change it to loop="false".

Why I don't advice adding music that automatically start to a blog or any other websites

When you install an invisible music player, that means there will be no button to click to start the music. Therefore you must make the music play automatically for it to make any sense. That is why there is the attribute autostart="true" in the script.

A surfer may visit your site in the middle of the night while others are sleeping, or with a sleeping baby beside him or her, or in a public library, or he or she may already have his or her favorite music playing in the background. Once your music start, the visitor may be forced to quickly surf away from your site to stop the music and you lose a visitor. And if a surfer has already his or her favorite music playing, your music will replace that, and that may cause irritation. There will be no button anywhere for the visitor to click to stop the music.

Still want to install an invisible music player. Well, everyone have their own preferences and opinions and what they think is good or no good. The choice is yours.

Related posts:

Hot linkable file host and embedding music player
How to add music to your blog
Add MP3 player to your blog
Easy way to add music to blog (eSnip)
eSnip music player in sidebar
Make music slideshows with Fliptrack

Music at Amazon

Put back blog title which have been removed: How to

Because of requests, I have previously published Remove blog title: New Blogger. Now a blogger contacted me and said he is in big trouble because he remove the blog title and now wants it back. I have already given reasons why in my opinion the blog title should not be removed. I now have added a note at the top of the post to read the rest of the post plus backup the current template PLUS any Page Element which can be back up before you tamper with the template. See How to backup and edit template PLUS backup Page Element for New Blogger.

Fortunately, the problem is not insolvable. To get back the blog title, sign into blogger.com (Dashboard) where you will see a list of all the blogs you have created. Click LAYOUT for the problem blog. Then in the LAYOUT click the TEMPLATE tab followed by the EDIT HTML sub-tab to get to the template editor. Inside the template editor, look for this line of code:

<div id='header-wrapper'>

It should be near the bottom of the unexpanded template, after the CSS (Cascading Style Sheet). If you have problem finding it, press ctrl+F keys simultaneously. A "Find" box should appear in the task bar at the bottom of the web browser (see screenshot below:

Find box obtained by pressing ctrl+F

and type or copy all or part of whatever you are trying to find. Click "Next" and the template should scroll down to the part where the code is located and the code highlighted. Now paste this code below the code you just located:

<b:widget id='Header1' locked='false' title='Dummies" Guide to Blogger (Header)' type='Header'/>

Preview, and if everything is OK, save the edited template.